Hi I’m Paralax. I’ve been doing stuff for the
demoscene since around 2001. Recently
I’ve been involved in a demo project that (surprisingly enough) won us the
PC Demo competition at Revision 2019:
sp04 - Airplane? by Spacepigs.
I didn’t see it coming but in any case: I’m grateful and more than hyped that
this has happened. Hats off to all competitors of this party, so many releases
were simply stunning and I had an awesome time!
I’ve mostly recovered from the party and so I thought it would be as good a moment
as any to write something about the portion of the project I’ve been directly
responsible for: the tool support.
I’d like to structure this article into three parts. First I’d like to describe
the principal challenges I see in demo making, how these challenges have
influenced the set of tools I’ve written over the years and conclude by describing
the latest tool I’ve made, the one used for our Easter release: the speckdrumm bart tool.
Table of Contents:
- Demo making Challenges
- My past approaches to demo making
- The naive approach
- Demo scripting
- Hennecke.Net
- Bart Tool
- Bart Basics
- Speckdrumm.Bart.Stubble
Demo making challenges
Let’s condense demomaking down to the bare essentials and go from there. I think any demo
can be described as a piece of software that modulates a set of parameters over time. These
parameters are tied to some kind of artistic vision and drive whatever specific technologies
are employed for realizing said vision. It’s the job of a democoder to author all required
base technologies and come up with specific code to realize the desired output.
Given this premise it seems to me that one goal for efficient demo making must be to support
an authoring workflow where outcomes of parameter changes are instantly visible. Authors
spending less time waiting can get more done and will end up with more refined results.
I see my strenghts in providing support for collaborators and
working with large code bases made to realize this support. This approach has informed my past
strategies to demo making. I’d like to go back to the beginning and review how this has turned
out until now.
The naive approach
Back in 2001, when I first started thinking about working on a release my first approach
was of course the most straightforward: create a new C++ project, initialize DirectX,
put in some kind of visuals, play with numbers in the code and evolve from there.
Obviously this had some major drawbacks. Every time any number is changed the executable has to
be recompiled. Afterwards the entire demo has to be reloaded. Most time is spent waiting
and little time is spent on tweaking. Clearly a more efficient way of authoring content was needed.
Demo scripting
My first approach to solving this problem was pretty much copied from the
Farbrausch release Fr09 - Goldrausch.
This release came with a simple script that loaded all necessary resources,
arranged cameras, animated parameters etc. Inspired by this approach I made up a
similar system that supported very specific text commands - a kind of demo DSL
if you will.
Input text was tokenized, converted into a very simple byte code representation
and executed prior to demo execution. I’ve also added an in-demo text editor that allowed
me to tweak the script while the demo was already running. Doing this essentially cut the
reloading penalty I’ve had to deal with earlier. My first demo I worked on already comes with
this kind of system: Speckulation by Speckdrumm,
released at Underground Conference 2002.
In a way it’s a funny coincidence that 17 year later we’d win the PC demo competition with an
invitation for the latest revision of this very demo party ;).
We worked with this scripting system for a while but by 2003 it became evident that
this approach was holding us back. For once, this way of working was too coder centric and
that means that our artists didn’t want to author demos using this system. They were
accustomed to tools like 3D Studio Max and Photoshop and wanted something similar.
Hennecke.Net
We needed a real demo tool. After releasing Speckdrumm vs. Ferdi Tayfur
I set out to do just that. I came up with a tool called ‘Hennecke.Net’, half-seriously named after
the East German miner Adolf Hennecke, famous for
overfullfilling his work quota by 387%.
Hennecke.Net is made up of two parts: there’s the tool user interface that allows an artist to
create content and the engine executable that does the actual rendering. The engine is automatically
started by the demotool and made to render into a window provided by Hennecke.
Only the engine executable will be part of any release. The demo tool and the engine executable
communicate via TCP/IP using a simple custom text based protocol.
The engine executable is set up to provide an array of ‘entity types’ to the demo tool. These
can be instantiated inside the demo tool and will run any kind of code inside the player process.
Entities can also have properties that can be animated by binding them to controllers and
possess optional input and output pins in order to share data with other entities.
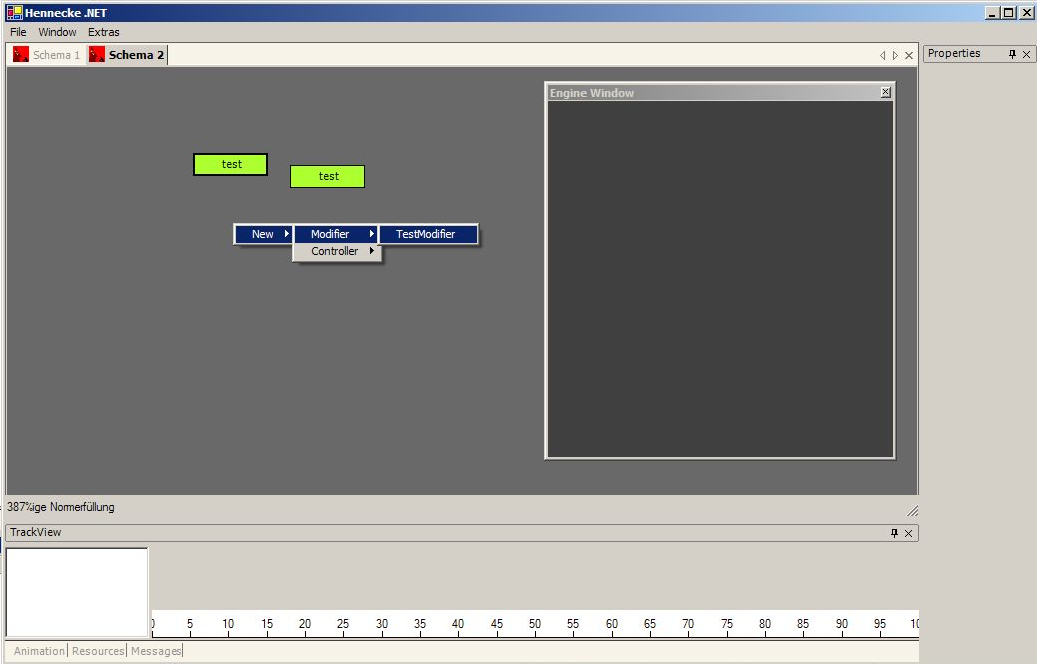 A very early version of Hennecke.Net, Nov. 2003
The resulting DAGs made up of connected entities can then be arranged on a timeline. The tool
UI also comes with a dedicated curve editor. This editor sports certain keyframe editing
capabilities that are dependent on the type of parameter that’s animated. Animated floating
point numbers are visualized as one dimensional curves, colors are split into their four
components, enums are blocks on a grid and so on.
The demotool is also able to resynthesize the commands necessary to restore the demo state.
This is needed to export the demo into a standalone executable. An exported demo is nothing
else but the player executable merged with an archive containing all necessary assets.
This asset is expected to contain a specific text file containing the commands to load the demo.
A player executable that’s not started with special commandline arguments will first try to
find this script and launch itself that way.
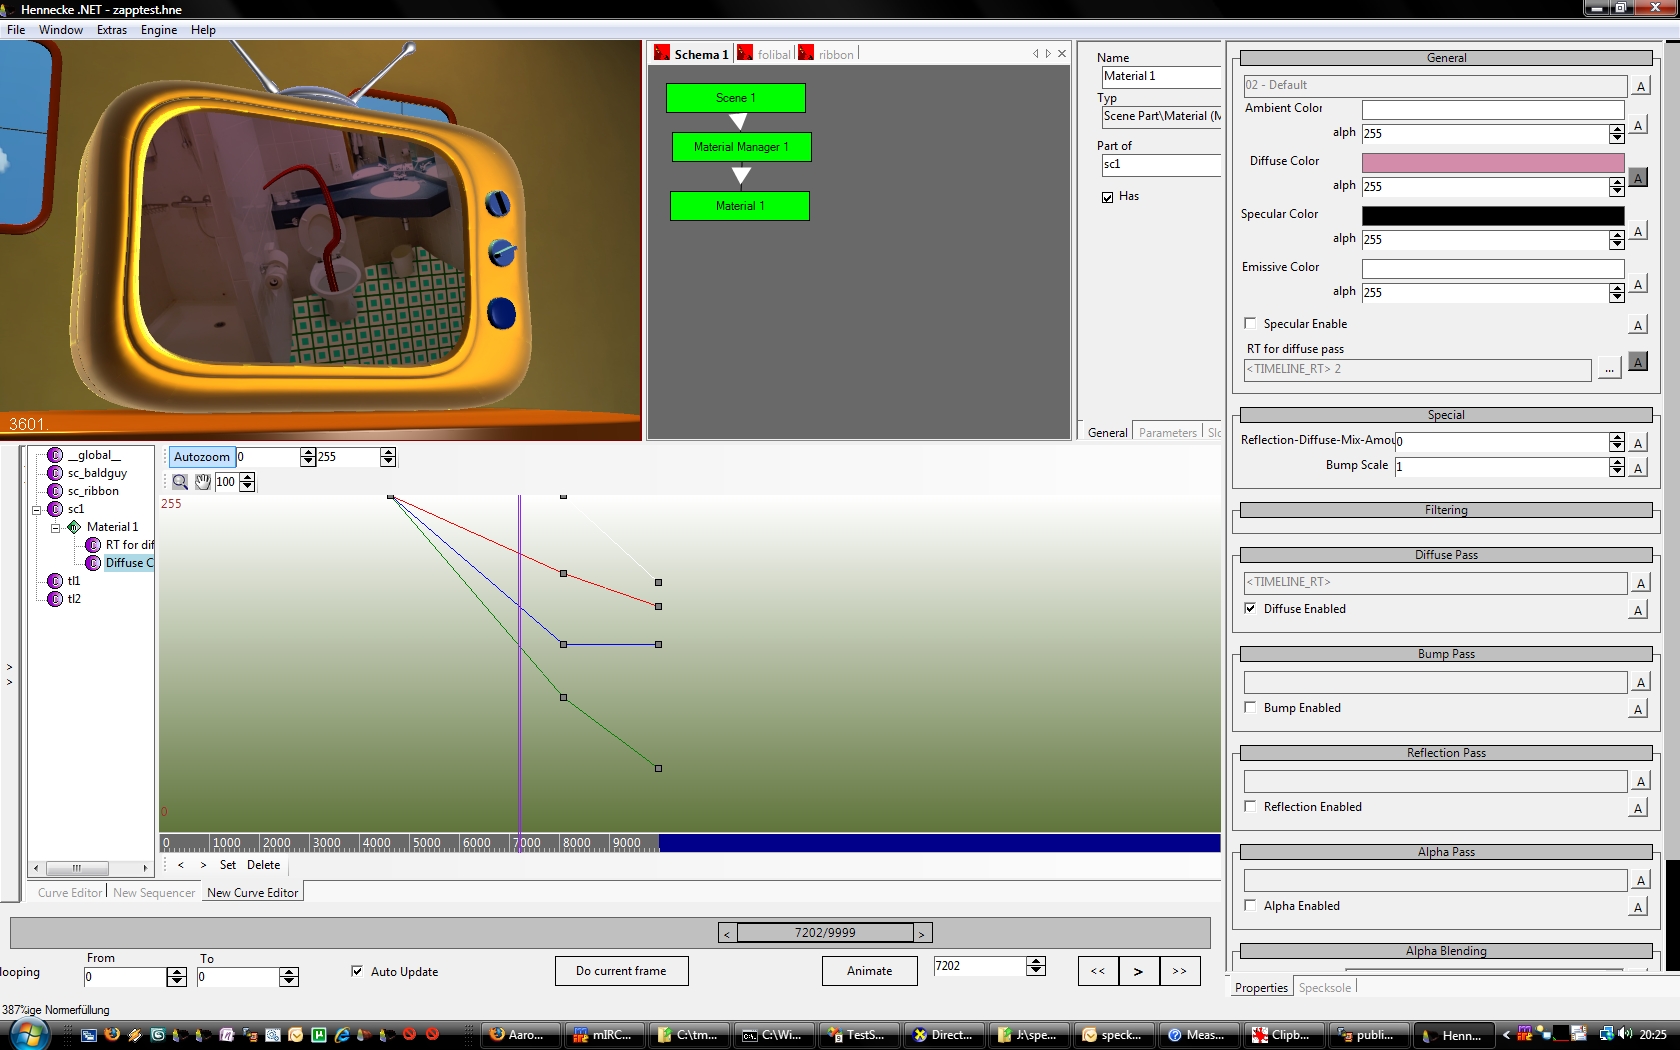 A surviving shot of the curve editor, October 2008
Later on we also had support for multiple timelines which allowed us to nest timelines and
use render to texture in order to embed composited output in parts of another scene.
We used this functionality to render the fake TV spots onto the TV screen of our 2008 winnig
entry Zapdrumm.
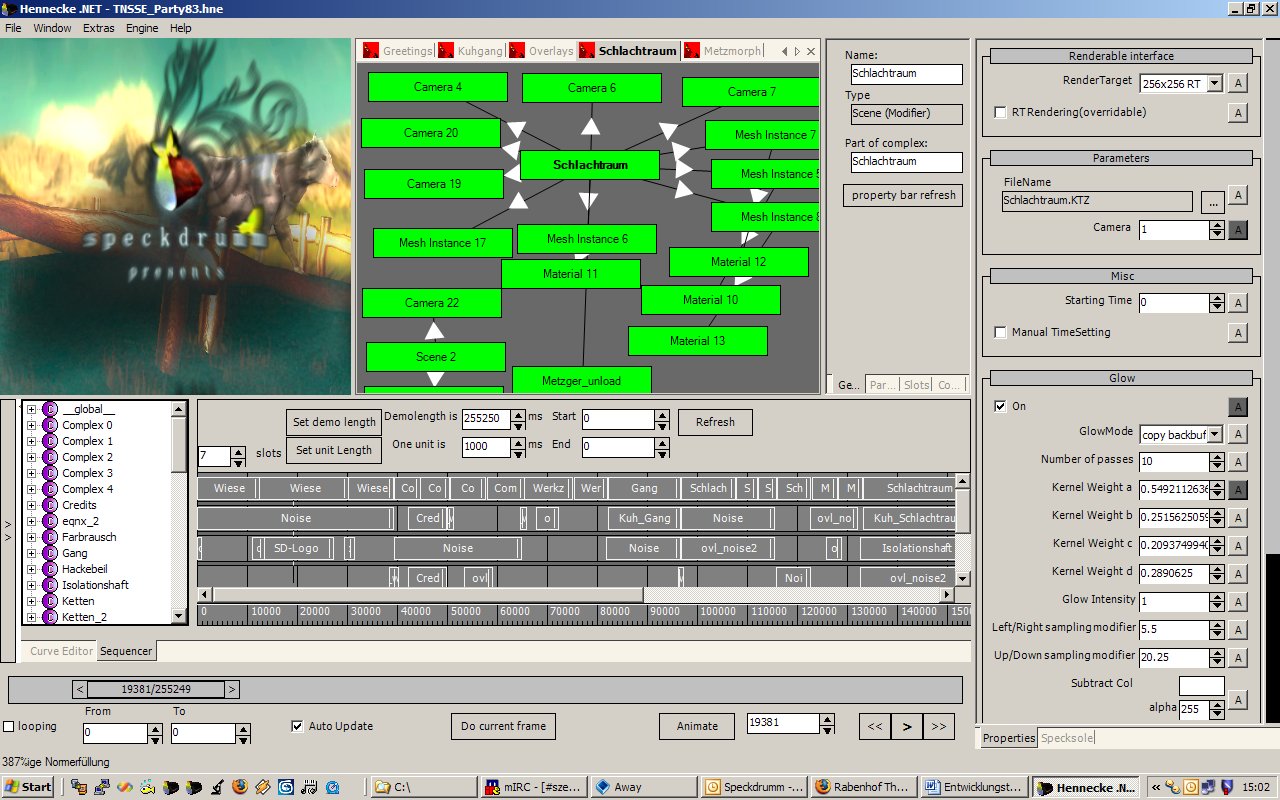 A final shot of the tool showing The Nonstop Schlachthaus Experience, June 2005
In total we used Hennecke for ten PC demos. By 2009 however it became clear that the way the
tool worked was no longer up for the task. For once the underlying architecture of the tool
wasn’t in great shape. It was hard to extend the demotool because parts of the logic and
the UI were intimately coupled. It’s been six year since I started this project and by then
I knew how to do better.
Another problem that became evident was that it was really hard to
modify specific parts of a scene. We had entities that could load scene files that were
exported into our own scene format. These entities provided access to cameras and lights but
It was hard to attach new nodes to the scene graph. Furthermore, while the tool realized a
pretty usable WYSIWYG experience, any new entity property that was needed meant going back
into Visual Studio, extend and test the new entity behavior and share a new version of the
player.
Wouldn’t it be great if entity authoring could be done right in the environment?
Before starting a new demo tool we wanted to work on a game entry for which we also needed
some kind of tooling. This new project for a simple barber game was fittingly called ‘Bart Tool’
(German for beard). We never realized any part of the game but instead this was the stepping
stone for the demo tool we’re still using today.
During the time when we still thought about doing a game entry, I worked on a Visual Studio
extension for my master’s degree in software engineering. With time I familiarized myself
with the APIs Visual Studio provides and learned how the architecture fit together.
I became more and more convinced that it would be fun to duplicate this general approach
and end up with an extensible shell that could be used for many different scenarios.
Going this route was probably the boldest violation of the KISS
principle I ever dared to engage in ;). It obviously wasn’t an efficient way to continue making demos.
It didn’t matter to me though since this was a hobby project and I did this just for fun and
because I could.
Bart Basics
Bart by itself is an application that - very much like Visual Studio - comes as a generic extensible
shell. It is again written in C# and the core UI is based on Windows Forms.
By default it can manage solutions and projects that may be part of a solution, display properties,
show tabbed log output and provide base services such as the ability to open a project item using an
editor.
When Bart starts it searches the file system for .dll files in its assemblies subdirectory and
uses reflection to test if any such assembly provides a so called ‘package’ implementation.
Packages are extension points into the application and are able to add various kinds of functionality
to the demo tool.
A package may contain the following components:
- Properties - Serializable values that may influence the behavior of the package. Package properties are
accessible to the user via the options menu which is similar to Visual Studio’s Tools->Options dialog.
- Editor Factories - A set of factories that provide new editors to the tool.
- Project Factories - A set of factories that provide new projects to the tool. Any project may influence
the set of available project items and come with extra contextual information.
- Project Item Factories - A set of factories that support addition of a specific kind of item to a project.
- Property Designer Factories - These components add new ways to visualize values in the built-in property grid.
- Context Menu Commands - These commands can extend the application context menu or the solution explorer.
- System Services - An addition to Bart’s internal service system. Services can be retrieved by interface
and are automatically integrated with the built in dependency injection mechanism to support multiple schemes
of automatic service injection. Bart does not use singletons and dependency injection is used everywhere.
- Named Pipe handlers - These are extensions to the generic named pipe server that comes built in. As it is
today we use named pipes to speed up our scene importing workflow (one-click import) and push C# compilation
requests from generated Visual Studio projects containing demos scripts.
- Custom init code - on initialization a package is handed an interface that provides it with full access to
any service it may desire. Our current demo system uses this approach to create a new tool window and prepare
rendering.
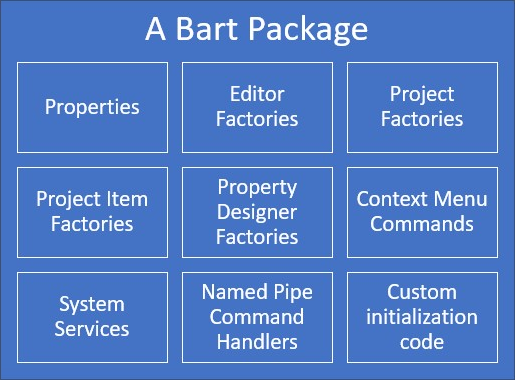 Common extension points any Bart package may provide
Bart initializes all packages it finds. It also comes with an array of core services and of course various
UI components in order to facilitate interaction with the user.
The most important core services are as follows:
- Solution manager - Provides API access for the one solution the tool can manage at every point in time.
- Shell - Various APIs for influencing docking, layout, access to the main window.
- Editor handling - Editor Factory registration, editor state management, various editor specific events.
- Named pipe server - Provides registration APIs for synchronous and asynchronous named pipe handlers.
- File Watcher - Monitors all project directories and provides file change events and APIs to determine when
files have last been written to.
- IOC - provides access to tool services and allows registration of new services.
- Focus handling - Keeps track of the active form and gives views the opportunity to handle user input
starting with the most concrete child control and going up the ownership chain until arriving at the tool main
window.
- Log Output - Provides services similar to Visual Studio’s output window.
- Packages - Supports the package management infrastructure and provides APIs for pacakge property (de)serialization.
- Project Types - Provides API access for project- and project item factory management and retrieval.
- Selection - A service that keeps track of all entities that are selectable in the current usage context
and which entities are currently selected. Selections are reflected by the designers shown in the property grid.
- Status Bar - Basic APIs for controlling the contents and color of the status bar.
I’ll refrain from detailing the UI components that come with Bart. They’re listed in the diagram listed next and
should be pretty self explanatory:
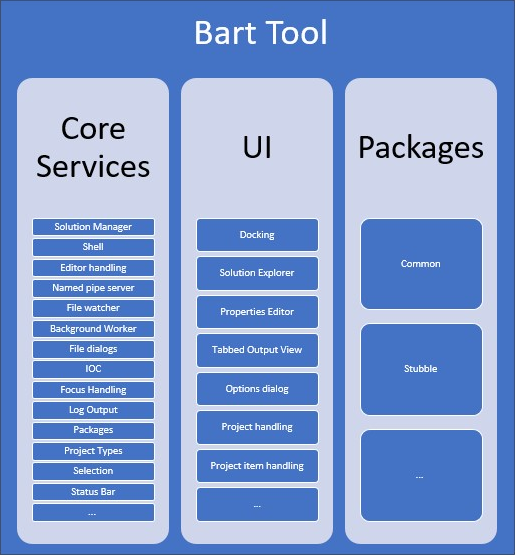 Notable components that make up Bart
Speckdrumm.Bart.Stubble
As explained, Bart by itself does nothing particularily useful. Only an extended Bart
is a good Bart! I worked on various packages over the years. These included an
integration for a modular software synthesizer concept suggested by Muhmac^Speckdrumm
and a package that wrapped our DirectX based successor to our previous engine. For various
reasons none of these attempts really paid off in the end. In May 2015 I started a new
package based on a concept suggested by Muhmac. I called it ‘Stubble’ to keep our peculiar wording
consistent ;). Stubble is a Lua based live programming environment that in a way is
pretty similar to Hennecke.
It supports the creation of graphs made of nodes. Nodes share data via their
input- and output pins that are now explicitly visualized. Input pins can
also be animated via a pattern editor that is similar to GNU Rocket.
Finally any graph and an associated pattern can be laid out in a sequence that
indicates the general flow of the demo.
Stubble improves upon Hennecke by supporting a live coding approach. It is possible to
add a new lua file to the project, define a new node with various pins and instantly use
that node to drive some kind of logic in a graph. When pins are changed, the node
representation for all instances of this node are instantly updated.
When execution logic is changed, the new behavior will be instantly visible after the
file has been saved. In fact the entire render loop of Stubble is written in Lua and
the demotool will generate Lua code at runtime reflecting topology changes in any graph
that’s updated and realize the position of any track item that’s put into a sequence track.
Working with Stubble looks a little bit like this:
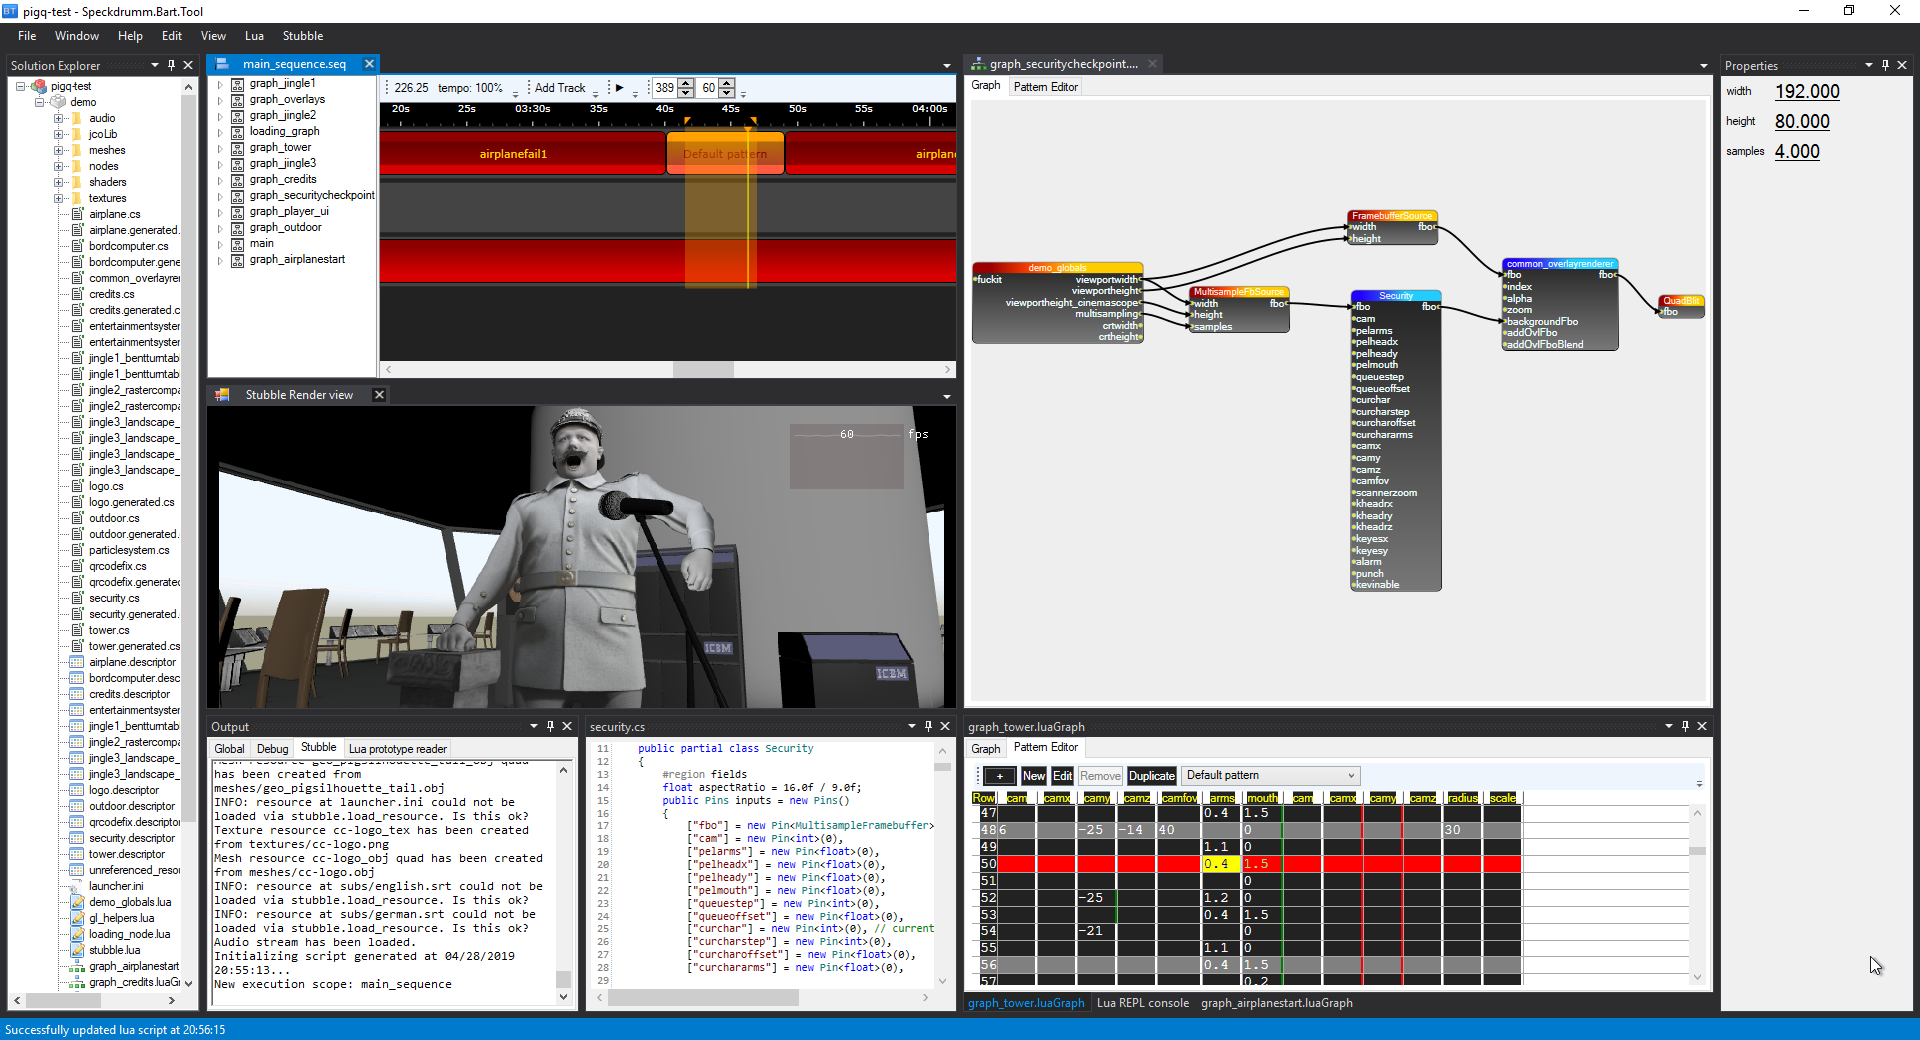 Some of the functionality provided by Stubble
The screenshot above shows Stubble’s engine view as well as an opened sequence-, script-,
graph-, and pattern editor.
Conceptually, here’s an overview of the components Stubble integrates into Bart:
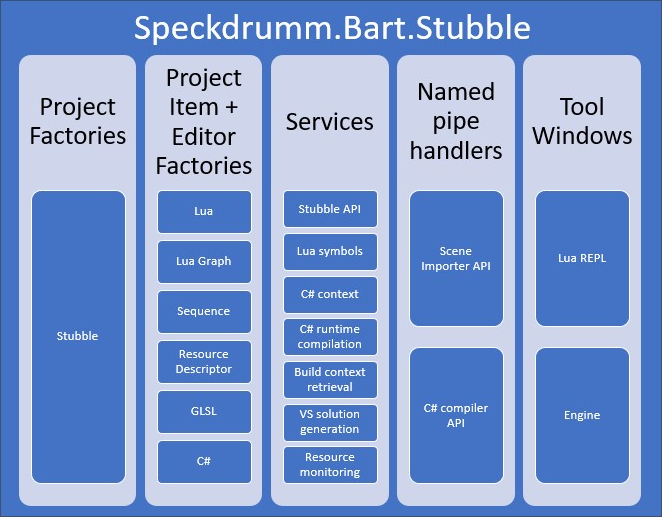 Stubble components that extend Bart
Stubble is a large piece of software. It took me two years of my spare time to get the
basics to work. I pretty much did it all by myself apart from some GL rendering code that
was sponsored by Muhmac. By March 2017 we had a private slack channel,
Team City as a build server and a self hosted
Gitlab instance. We were ready for a test run and so I gave the
tool to JCO. At this time, only a coder could use Stubble since every
node we’d need would have to be made from scratch. Jco didn’t flinch. Within two weeks he
wrote up some simple scene graph traversal code, made a Cinema 4D exporter plugin that would
convert a scene into code that fitted his lua representation and created
sp04 - Hello, Kevin - A Dental Journey. The demo
ranked 2nd at Revision 2017 and earned a
meteoriks nomination for best direction
later that year.
One year - and three demos later - we released Echo Chamber at
Revision 2018, ranking third and again scoring a meteoriks nomation for best direction.
By then it became quite clear that our Lua based live coding approach had one big problem:
As mentioned, each frame of the demo is driven by Lua. Echo Chamber uses cube maps to render
reflecting objects and comes with many more objects than previous demos. Due to the overhead LUA
imposes we became severely CPU bound. Echo Chamber ran ok on the compo machine but it was clear
that we had to do something about these performance issues.
After testing several alternative Lua implementations I concluded that we already used the fastest
version that was available to us. I thought about this a little bit
and came up with a new approach: integrate C# as a runtime script into the demo tool and make sure
that C# nodes can be used just as if they were written in Lua.
Fortunately, the C# compiler made by Microsoft is open source these days
and generally in a great shape. In around a month I had a proof of concept that showed that this could
actually work. It would take most of the year though until we arrived at the state we needed to be able to
use C# in production. In order to demonstrate that we were ready I ported the party version of Echo Chamber
to C#, yielding pretty immense speed ups.
I also worked on a full Visual Studio integration feature. As it is today users of Stubble can press a button and
Visual Studio will be launched (or refreshed) automatically, opening a generated project that contains all
C#+Lua scripts and shaders added in Stubble. The Visual Studio project also contains two configurations
made to interact with the current tool state when the project is executed:
- Build in Stubble - Tell the currently running demo tool to (incrementally) recompile the C# scripts and to update
all C# node instances which will refresh the overall behavior to the most current source code state.
- Debug - Tell the current Visual Studio instance to attach to the Bart process via COM automation. By doing
so we can debug the current state of the demo and live inspect all node values that are of interest.
This works because in-tool script compilation in contrast to the final export data always yields updated symbol
data associated with a new version of the assembly.
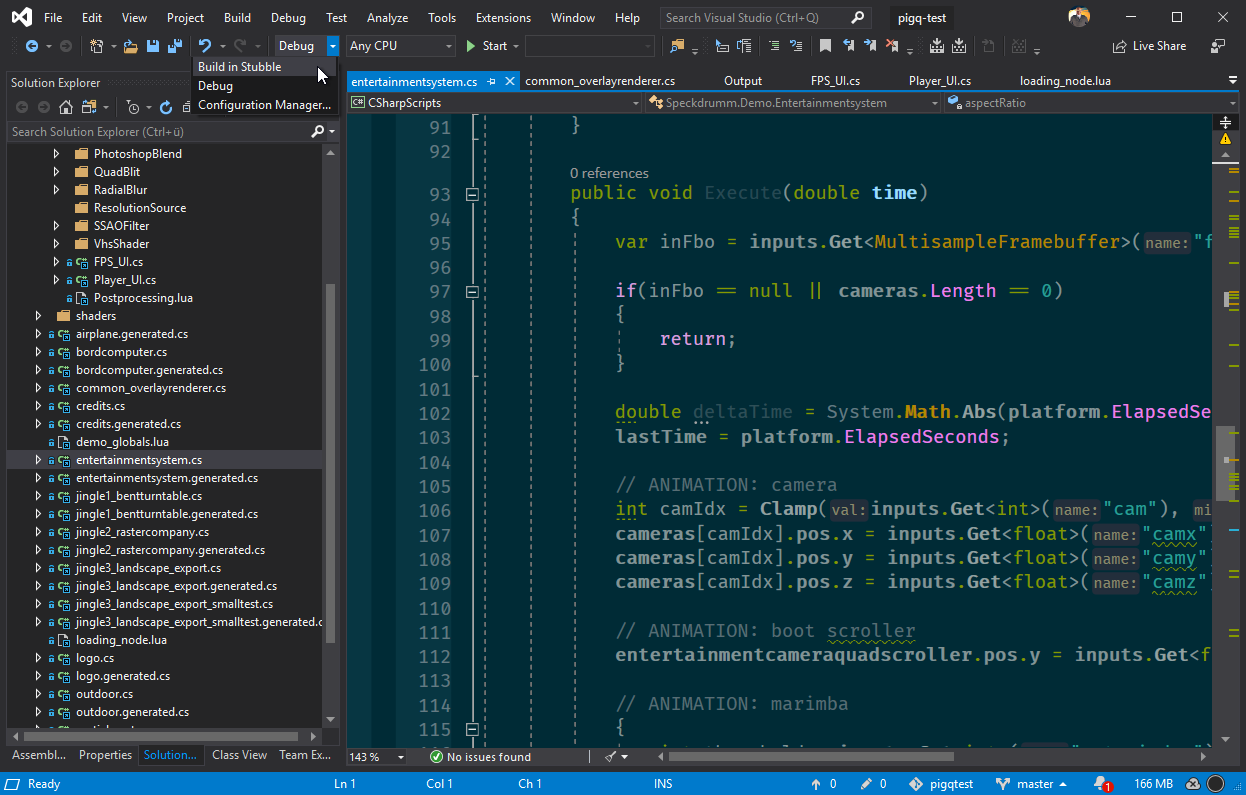 A Visual Studio project generated by Stubble
Finally, I implemented a file watching service and a resource monitor. The former is now a core service because it
is just immensely useful to be able to react to external file writes as they happen.
The resource monitor uses the file watcher service to ensure that whenever any project file is written on disk,
the tool will reload affected resources and refresh its live state. This way we can now use Visual Studio for all things
live coding. We still have Scintilla based editors in our demotool that work okay
but Visual Studio is just hard to beat.
Since a demo tool’s job is only done when it has produced an executable I’ve also had to
integrate the Roslyn compiler with our exporter logic. During demo export I use Roslyn to
compile all C# scripts into a ‘merge assembly’. I also include our zipped demo assets in the
form of an assembly manifest resource stream. This assembly is finally merged into a copy
of the player executable using ILMerge.
ILMerge also allows me to influence executable attributes, the demo icon and turn on
some options useful for player standalone debugging. At the end of it all, we get a finished
executable ready for the compo. And that’s where we are today.
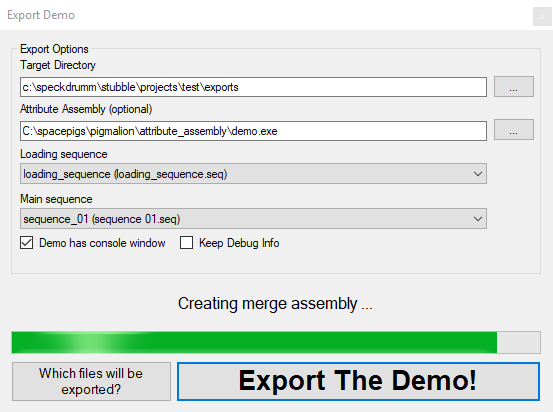 One-click export in Stubble
What else to say? If you’re still reading this then first of all thanks for your interest ;) It’s been a wild ride
doing demos for so long but I’ve learned a lot, had some fun and made some friends on the way.
I guess that’s all for today. See you all in another article!